Search Results
41 results found with an empty search
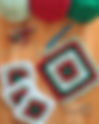
- Granny Square Book Sleeve - Free Pattern
I am a big reader, I always have at least one book, normally 2 or 3, on the go at any one time. Usually, I read books on my Kindle. It's so light to hold, I can read in bed at night without needing a light on and it's super convenient for taking with me when I leave the house however over the last few months I have been picking up more and more physical books. I love this for me as I have so many physical books on my bookcases that are just begging to be read. The only problem is that whenever I want to take my book out and about with me it ends up getting so beat up in my bag. I knew that I needed to make a special sleeve for it just like I did for my Kindle. I love my Daisy Delight Kindle Sleeve (You can find a the free pattern here) but I knew for this that I wanted to try something that was super easy but still looks really cute and could accomodate books of varying thicknesses. Cue the super simple Granny Square Book Sleeve! The beauty of using a granny square is that you can use any yarn and hook combo that you choose and simply work the square until it is large enough to accomodate your desired reading material. I made mine to fit standard UK paperbacks as this is what I tend to read most but you can absolutely make it larger to keep your favourite hardbacks cosy, or even make a slightly smaller version to hold a Kindle. Whilst you can use any yarn you like along with a corresponsing crochet hook, I will be referring to the yarn, hook and measurements releveant to the book sleeve that I made. Simply use this as guidance when making your own. Let's get to the pattern! Before you begin: You will need: 1 ball of Yarnsmiths Bizarre DK - I used approximately 52g per book sleeve in shades Splendiferous (brights) and Shennanigans (neutrals) A 4mm crochet hook Scissors Tapestry needle Button or toggle Try to have a book to hand for checking the sizing! Stitch Abbreviations (US Terms) SC - single crochet DC - double crochet Cluster - granny stitch/ 3DC worked into the same space Sp - space Sl st - slip stitch Ch - chain Gauge: Gauge is not especially important for this pattern as you will work to the measurement of your book or device using whichever yarn you choose. However, for reference after completing 3 rounds of my granny square it measured 7cm in width. Pattern Notes: Ch3 at the start of a round does count as a stitch unless stated otherwise. Round 1 will be the right side (RS) of your work. You will turn your work at the end of each round. I did not change colour at all for my book sleeve but you could opt to change colour every round, have a contrast border etc whatever is most appealing to you. I am assuming some knowledge of crocheting a granny square, if you would like a more indepth tutorial for this you can find one here. The Pattern: Making the Granny Square Make a magic circle (or you can chain 4 and sl st to join and create a circle) Round 1 (RS): Into the magic circle, ch2 (counts as a stitch here and throughout). Work 2 DC and ch1. Then work *3DC, ch1* repeating from *to* 2 more times. Sl st to top of ch2 to join. Ch2 and turn. Note: At the end of this round you will have 4 clusters of 3DC and 4 ch1 spaces. The ch1 spaces are your corner spaces. Round 2 (WS): Work 2 DC into the chain space at the base of the ch2. [3DC, ch1, 3DC] into each of the next 3 ch1 corner spaces. 3DC into the final corner space (where you worked your initial ch2, 2DC) and ch1. Sl st to top of ch2 to join. Ch2 and turn. Round 3 (RS): Ch2 and work 2 DC into the chain space at the base of the ch2. *3DC into the space between clusters from previous round and work [3DC, ch1, 3DC] into the corner space* Repeat from* to* 2 more times. 3DC into the space between the clusters from the previous round. 3DC into the final corner space and ch1. Sl st to top of ch2 to join. Ch2 and turn. Repeat round 3 until you have a total of 16 rounds, or however many rounds are required for you to be able to fold three corners together to meet across your book (see photo). For my granny square to snuggly fit a standard paperback is measured approximately 41cm across diagonally from corner to corner. Fasten off leaving a tail of about 30cm. Joining Once your granny square is the appropriate size for your chosen book or device, you will need to seam the three flaps together to join and create. the envelope style we are after (see photo). The seam will be done with the RS of your work facing you. Note: As we have been turning our work with each round there is technically no right or wrong side to our granny square however I always count round 1 as the RS. I had 16 rounds for my granny square, meaning that I ended on a WS round and need to turn my work before beginning the seams. Try to orientate your granny square so that one of your seams can be done with the tail you left when fastening off - it saves an extra end to weave in! I simply seamed the two edges together by working through both loops of the stitch on one side and the corresponding stitch on the other. If you have a preferred seaming method then feel free to use that here. You will need to attach yarn to seam along the second join, work this in the same direction as seam one to ensure a neat finish. Fasten off. Border I like to add a simple SC border around the opening of the book sleeve to neaten the edges and add a little bit of extra strength. With the RS facing you, attach your yarn to the centre point of the sleeve opening on what will be the inside (where you just completed the joins). SC into each st around the opening. When you reach the ch1 corner space, work 2SC into the ch-sp and then continue around. Sl st to first SC to join and fasten off. Fastening Sew on your chosen button or toggle to the 'inside" of your book sleeve, ensuring that it is in a position where it can be reached by the top flap of your sleeve. We have not intentionally created a buttonhole for our sleeve as the fastening will go through the ch1-sp of the remaining corner. It's a good idea to check that your chosen fastening will fit before you sew it on! Weave in all of your ends and your Granny Square Book Sleeve is complete! I really hope that you enjoyed making your very own Granny Square Book Sleeve! I think these would make great gifts for the book lovers in your life or even as quick makes for selling at markets or craft fayres! I'm always happy for you to sell items made with any of my patterns, I just ask that you direct people to the pattern should they ask ☺️ I'd love to see your versions so please do tag me in your posts on social media @Brambles.and.Hart and use the hashtags #BHFreePatternMakes #BramblesandHart If you are not already following me on social media then what are you doing?! I'd love to see you over on Instagram @Brambles.and.Hart, and do subscribe to my YouTube Channel which is currently undergoing a little revival! If you would like to support me further and help me to keep creating free patterns and tutorials to share with you then do consider buying me a coffee on Ko-fi! Happy crocheting! Shelley ♡
- Rainbow Drops Blanket - Free Pattern
The Rainbow Drops blanket is perhaps the softest, snuggliest blanket I have ever made! I designed this blanket using Yarnsmiths Chenille DK which is a new yarn to the Yarnsmiths range and available exclusively at Wool Warehouse (not an affiliate link) You can read my honest review of the yarn here. For this blanket pattern I selected 9 stunning pastel shades of the Chenille DK and paired them together in a colourblock style to create a beautifully eye-catching pastel rainbow blanket. Finished with a clean and simple border, this blanket is the sweetest! At time of publication (April 2026) Chenille DK is currently on offer for £1.50 per 50g ball (usually £2.50) so it's pretty sweet on the price too. A large baby blanket for less than £15 (still only £22.50 at full price!) This is a beginner friendly pattern, although if you are not familiar crocheting with chenille yarn I would suggest having a little practice first. It would also be a great mindfulness crochet project for a more experienced crocheter. I also think that the Rainbow Drops Blanket would make such a wonderful new baby gift! Of course you can switch up the colours to work with a colour scheme of your choice but I am a little in love with this one even if it's not my usual colour palette. Now let's get to the pattern! Before you begin: You will need: 1 ball of Yarnsmiths Chenille DK in each of the following shades: Blush, Peach, Lemon Yellow, Light Pink, Pale Lilac, Sky Blue, Duck Egg, Light Sage and Cream. A 5mm crochet hook Scissors Tapestry needle Optional - lighter or match to melt the end of the chenille yarn before weaving in your ends. Yarn Notes: The yarn amounts provided for this pattern are based on making a blanket that has a finished measurement of 88cm x 85cm/ 34.5" x 33.5". If you wish to make alterations to the size of the blanket then you may need more or less yarn. Also be sure to check your gauge as a different tension could also result in you requiring more or less yarn. I have used 8 different shades to give me 8 different colour blocks. You could use 4 colours and repeat them twice, or add in more shades for more colour blocks. Stitch Abbreviations (US Terms) SC - single crochet HDC - half double crochet DC - double crochet Cluster - granny stitch/ 3DC worked into the same space Sp - space Sl st - slip stitch Ch - chain Gauge: 4.5 Clusters x 9 rows = 10 x 10 cm/4" x 4" Pattern Notes: Ch2 at the start of a row does count as a stitch unless stated otherwise. You will be working in rows, turning your work at the end of each row. For the border you will work in the round. You will only change colour at the end of a row. To do so, fasten off your working yarn leaving a long tail for weaving in. Turn your work to begin the next row, attach your new colour to the first stitch and ch2. To alter the width of your blanket you will need a starting chain that is a multiple of 3. The Pattern: Blanket Using Blush and a 5mm hook, chain 108 Note: If you find it difficult working into the chain you can use a larger hook then switch to the 5mm for row 1 onwards. Row 1 (RS): DC into the 3rd chain from then hook (the ch2 counts as a stitch here so you now have 2 sts - the ch2 and the DC). *Skip 2 chains, 3DC into the next st*. Repeat from * to * until you have 3 chains remaining. Skip 2 chains and work 2DC into the final chain. Ch2 and turn. You should have 34 clusters (3DC) and 2 2DCs (one at either end). Row 2 (WS): Work 3 DC into the space between the 2DC and first cluster of the previous row. 3DC into each space along until you reach the end of the row. DC into the top of the ch2. Ch2 and turn. Row 3 (RS): DC into the st at the base of the ch2. Work 3DC into the space between each cluster along. Work 2 DC into the top of the ch2. Ch2 and turn. Rows 4 - 9: Repeat rows 2 and 3 alternately. Fasten off Blush at the end of Row 9 and join Peach. Rows 10 - 18: Repeat rows 2 and 3 alternately, ending with a repeat of row 2. Fasten off Peach at the end of Row 18. You will continue on in the pattern, repeating rows 2 and 3 alternately and changing colour every 9 rows. Your row count and colour order will be as follows: Rows 19 - 27: Lemon Yellow Rows 28 - 26: Light Pink Rows 37 - 45: Pale Lilac Rows 46 - 54: Sky Blue Rows 55 - 63: Duck Egg Rows 64 - 72: Light Sage Fasten off Light Sage and continue on to the border. Border Using a 5mm hook. With the RS facing you, attach Cream to a space between clusters along the bottom edge of your blanket. Round 1: Ch2 and work 2DC into the same space. Work 3DC into each space along until you reach the corner. You will be working over your starting chain. When you reach the corner, work (3DC, ch2, 3DC) all into the same space. This will mean working over the 2DC at the end of the row. When working along the edge of the blanket, work 3DC into every other row. These will be the rows that started/ended with a single DC. You will crochet over the post of the stitch. At the corner, work (3DC, ch2, 3DC) and then work 3DC into the space between each cluster along. Repeat this around your blanket until you reach where you began. Sl st to top of ch2 to join. Ch1 and do not turn. Round 2: HDC into each stitch around, working 3HDC into each corner ch-sp. Sl st to first HDC to join. Ch1 and do not turn. Round 3: SC into each st around, working 2SC into the middle HDC at each corner. Sl st to first SC to join. Fasten off. Weave in all of your ends and your blanket is complete! Note: When it comes to weaving in your ends using chenille yarn, you may find that you experience a lot of shedding. To combat this you can use a lighter to melt the end of the yarn, only very lightly as you don't want any black charring! Then you can weave in your end as normal without the shedding. Project Complete! I really hope that you enjoyed making your very own Rainbow Drops Blanket! I'd love to see your versions so please do tag me in your posts on social media @Brambles.and.Hart and use the hashtags #BHFreePatternMakes #BramblesandHart If you are not already following me on social media then what are you doing?! I'd love to see you over on Instagram @Brambles.and.Hart, and do subscribe to my YouTube Channel which will see a little revival very soon! If you would like to support me further and help me to keep creating free patterns and tutorials to share with you then do consider buying me a coffee on Ko-fi! Happy crocheting! Shelley ♡
- Yarnsmiths Chenille DK - A Review
A couple of weeks ago I was kindly gifted some of the new Chenille DK from Yarnsmiths. I'll admit to being a little apprehensive at trying this yarn because whilst I love Yarnsmiths as a brand and all of their yarns that I have tried before I don't have a great track record when it comes to Chenille yarn. Chenille yarns, blanket yarns, velvet yarns, plush yarns, anything like that are normally a no go for me. I'm not a fan of the texture, the shedding and how awkward they can be to crochet with. I also generally don't like how they look in projects either, aside from cute amigurumi plushies but I'm not an amigurumi girl. So let's put this yarn to the test and see if I can be a Chenille yarn convert! The Details: Name: Yarnsmiths Chenille DK Yarn Weight: DK/Light worsted/3 weight Composition: 100% Polyester Ball Weight: 50g Yardage: 100m/109yds Recommended Hook: 4mm Machine washable: Yes, cool wash 30 ° Tumble Dryable: No Special notes: This is a DK version of the Yarnsmiths Chenille Chunky yarn. There are 40 shades available which match with shades of the chunky version. Note that the chunky weight comes in 100g balls. Shades I tried: (3050) Cream (3062) Blush (3422) Peach (3170) Lemon Yellow (3410) Light Pink (3340) Pale Lilac - this is my favourite! (3256) Duck Egg (3260) Sky Blue (not pictured) (3185) Light Sage My initial thoughts: The colours are really beautiful, I chose a selection of pastel shades to try and they were all stunning. The Cream shade is perhaps more of an off-white and slightly duller than I was expecting but all of the other colours are lovely and just as I'd imagined. I do like how across the whole Yarnsmiths range there are the same shades. Some sub-ranges within the overarching brand have more or less shades available but I do find that it helps when it comes to choosing colours. For example, I love the Light Sage shade of Yarnsmiths Create Acrylic. I also like this same shade in their Cotton DK, Merino DK and Aran and now their Chenille DK! This yarn is super soft in such a nice, pleasing way. I'm not sure I can accurately describe how some Chenille yarns feel to me, like they have a kind of tackiness to them perhaps? Anyway, this yarn didn't give me the sensory overload that I would usually associate with this type of yarn and that's a win because it means I can actually attempt to crochet with it! Side note to say that my boys absolutely love the feel of this yarn and they have liked similar yarns I have previously tried also. If this is a yarn fibre that you would usually gravitate towards I think you'd be very pleased with the texture and feel of this one. Let’s Crochet! First off, I tried a couple of small sample squares one with the recommended hook size of 4mm and then with a larger hook. The 4mm hook felt like it was creating quite a dense fabric. If you were going to use this for an amigurumi project then that may be what you're after. For other projects such as a blanket which is what I intend to try and make you would be better off with a larger hook to get a softer fabric with more drape. I tried both a 4.5mm and a 5mm and it was the latter that gave me the finish that I was after so that is what I will be using for my project. I did find it a challenge to maintain an even tension but that may be more because I am not used to using this type of yarn rather than the yarn itself. Having said that there is a little bit of resistance or drag on the yarn against the hook, it doesn't glide smoothly. I do find this to be the case with this type of yarn which always surprises me as the yarn itself is so soft you think it would glide like butter! One big thing in favour of Yarnsmiths Chenille DK is that I did not experience any shedding whilst crocheting with it. That's definitely a huge plus as chenille yarns can be notorious for shedding and covering you in fluff whilst you crochet. Some are also quite patchy but in a full 50g ball I did not experience any 'bald spots' at all. Or factory knots! Not to say that this wouldn't happen but it's definitely a good sign. It also held up well to frogging. Chenille yarn is basically a piece of thread with lots and lots of fibres around it which create the fluffy texture and the bulk or weight of the yarn. The inner thread is very thin especially on a DK weight yarn so it can be snapped quite easily. I was able to put pressure on it and frog without experiencing a breakage. I also didn't experience any shedding whilst frogging. The yarn does show little indents in places where it has been previously crocheted and then undone but I think that is unavoidable with this type of yarn. The one time that I did experience an issue with shedding was when I fastened off and tried to weave in my ends however, a little bit of a google search later and I realised that this type of yarn needs to have the ends burnt/melted a little to prevent the shed. I tried this on my next end and it solved the problem. Yay! Would I Recommend? I would recommend this yarn for certain projects. I think it would be great for makers who enjoy creating amigurumi plushies, also baby blankets, comforters and perhaps cushions. Would I recommend it for garments or wearable accessories? No, probably not because I'm not sure how well the yarn would hold up with regular wear. For a chenille yarn I am impressed and it is one that I would look forward to working with again. If chenille/plush yarns are ones that you tend to reach for anyay then I think you would love crocheting with this Yarnsmiths Chenille DK. Rating: 7.5/10 + Beautifully soft texture + No shedding whilst crocheting + Good range of colours available - Maintaining consistent tension takes effort, could be challenging for a beginner - Nature of the yarn makes fastening off and weaving in ends trickier than other types of yarn Thank you to Yarnsmiths for sending me the yarn to try. It has definitely made me reconsider my general ban on plush yarns! Yarnsmiths Chenille DK can be purchased exclusively from Wool Warehouse for £2.50 per 50g ball. (At time of release of this blog post [April 2026] it is on offer for £1.50 per 50g ball!) If you have used or intend to use Yarnsmiths Chenille DK what projects do you have in mind? Which shade is your favourite? I'd love to know so please do leave me a comment below. I hope you have found this yarn review helpful and informative. If you have any other yarns that you would like me to review then send me a DM on Instagram @brambles.and.hart Happy Crocheting! Shelley ♡
- Sunburst Granny Square - Free Pattern
The Sunburst Granny Square is such a lovely design with many uses. These squares are perfect for beginners who have some familiarity with traditional granny squares and love their style but are looking for something with a bit more flair. Whether you make these squares in one colour, use a variegated yarn, stashbush or create sunflowers they always look amazing! You can use these squares to create a blanket, summer bucket hats, market bags, cardigans, jumper or even as little pockets for other garments! There are many variations on the Sunburst Granny Square and this pattern is for how I like to do mine. I do have a couple of options here one that uses puff stitches and one that doesn't - I know not everyone is a fan of puff stitches. Now let's get to the pattern! Before you begin: You will need: Your choice of yarn A crochet hook that is suitable for that yarn Scissors Tapestry needle For this tutorial, I have used Paintbox Simply Aran with a 5mm hook. Stitch Abbreviations (US Terms) HDC - half double crochet DC - double crochet 2DC Cl - 2 double crochet cluster 3DC Cl - 3 double crochet cluster TR - treble crochet Puff - puff stitch Ch-sp - chain space Sl st - slip stitch Ch - chain Special Stitches 2DC Cl Yarn over, insert hook into st and pull up a loop. (3 loops on hook) Yarn over and pull through 2 loops. (2 loops on hook) Yarn over and insert hook into same st, pull up a loop (4 loops on hook) Yarn over and pull through 2 loops (3 loops on hook) Yarn over and pull through all loops on hook. 3DC Cl Yarn over, insert hook into st and pull up a loop. (3 loops on hook) Yarn over and pull through 2 loops. (2 loops on hook) Yarn over and insert hook into same st, pull up a loop (4 loops on hook) Yarn over, pull through 2 loops (3 loops on hook) Yarn over, insert hook into same st, pull up a loop (5 loops on hook) Yarn over, pull through 2 loops (4 loops on hook) Yarn over and pull through all loops on hook. Puff stitches Starting Puff Ch2, yarn over, insert hook into st and pull up a loop (3 loops on hook) Yarn over and insert hook into st at base of the ch2, pull up a loop (5 loops on hook) Yarn over and pull through all loops on hook. Normal Puff Yarn over, insert hook into st and pull up a loop (3 loops on hook). Yarn over and insert hook into same st, pull up a loop (5 loops on hook) Yarn over and pull through all loops on hook Pattern Notes: Starting chains may count as a stitch, this will be stated in the pattern. You will not turn your work at any point. If you want to change colour, do so at the end of a round joining The Pattern: Make a magic circle. Round 1: Into the magic circle, ch2 (counts as a stitch). Work 15 DC into the magic circle. Sl st to top of ch2 to join. (16 sts) Blue photos show Round1 and Round 2 Option 1- 2DC Cl. Round 2: Option 1 - 2DC Cl Ch2 and work a DC into the chain space at the base of the ch2 followed by a ch1. (This counts as your first 2DC Cl) Work a 2DC Cl followed by a ch1 into st around. Sl st to top of ch2 to join. (16 clusters and 16 chains) Option 2 - Puff Stitches Ch2 and work a beginning puff st (see special stitches) followed by a ch1. Work a puff stitch followed by a ch1 into each st around. Sl st to top of ch2 to join. (16 puffs and 16 chains) Cream photos show Round 1 and Round 2 Option 2 - puff stitches Note: The following rounds are worked the same way regardless of whether you chose option 1 or option 2 for round 2. Round 3: Sl st into the next ch-space along then ch2. Work a 2DC Cl into the ch-space and the base of the ch2 and ch2. (This counts as your first 3DC Cl) Work a 3DC Cl followed by a ch2 into each ch-space around. Sl st to top of ch2 to join. (16 clusters and 16 ch2-spaces) Round 4: Sl st into next ch-space along and ch3 (counts as a st). Work 2 TR into the ch-space at the base of ch3 (this is part of your first corner, we will finish it at the end of the round). *Over the next 3 ch-spaces work the following 3 DC, 3 HTR, 3 DC respectively. Work a corner [3 TR, ch1, 3 TR] into the next ch-space * Repeat from *to* two more times, you will have 3 complete corners. In the final 3 ch-spaces work 3 DC, 3 HTR, 3 DC respectively. Work 3 TR into the same ch-space as your starting chain. Ch1 and sl st to top of ch3 to join and complete the corner. Fasten off. What Next? You can use your Sunburst Granny Squares for any number of projects, many of which will require you to join your granny squares together. Follow my CJAYG (Continuous Join As You Go) Method to join your squares together with ease. A simple way to connect squares for blanket, bags cardigans and more! I'd love to see your work so please do tag me in your posts on social media @Brambles.and.Hart and use the hashtags #BHFreePatternMakes #BramblesandHart If you are not already following me on social media then what are you doing?! I'd love to see you over on Instagram @Brambles.and.Hart, you can also follow me on TikTok (although I'm not particularly active there currently) and do subscribe to my YouTube Channel which will see a little revival very soon! If you would like to support me further and help me to keep creating free patterns and tutorials to share with you then do consider buying me a coffee on Ko-fi! Happy crocheting! Shelley ♡
- Easy Book Blanket Idea - Free Tutorial
In 2025, I completed my first book blanket and it was one of my most favourite projects of all time. It was definitely a challenge to keep up with a yearlong project but oh so worth it. I loved it so much that I am committing to doing another one for 2026! Whenever I've shared my book blanket progress online I've had DMs and comments asking for a pattern. Now I won't say that there is a strict pattern for my book blanket but I am going to outline what I did last year and what I plan to do this year so that you can do the same if you would like to. As with all crochet patterns there is a lot of room for customisation and making it something that reflects your personality. After all, you will be working on this for a whole year and so you want it to be something that you enjoy doing. I will share some ideas for how you could do things, whether you choose to do the same as me or something different. The possibilities really are endless though. What is a book blanket? Before we dive into discussing making a book blanket let’s first take a look at what a book blanket actually is. A book blanket is a yearlong project, similar in style to temperature blankets which have been super popular over recent years. The idea is that you make a square or crochet a row or two for every book that you read during the year. You are therefore, creating a kind memory map for the year, something you can look back on in years to come and think about all of the amazing books you read. It really is a special project to work on. You do not need to read an exorbitant amount of books to be able to make a book blanket. It can still be done even if you only read 20 books in the year. I’ll give for tips for that below too! There are lots of ways to go about making a book blanket and that’s where the real personalisation aspect comes in. It’s up to you if you want to do a granny square per book or crochet two rows of a blanket per book. You can choose whether you want to include books you DNF (Did Not Finish) or just those you did. It’s completely up to you. In this blog post I will be sharing how I approached my 2025 book blanket and the tweaks I am making for 2026 along with some alternative suggestions that you could use. My biggest bit of advice for your first book blanket, is to keep it simple and to use colours you love so that you want to keep working on it throughout the year. Choosing your Yarn Selecting the yarn for your book blanket requires careful consideration of a few different factors including: Yarn brand is it one that you can source easily? Yarn weight you can use any but think about how it will effect the overall size of your finished blanket Fibre use whatever you prefer be it acrylic, cotton, a wool-blend. It;s personal choice Colour palette I'll go into this in more detail below but it's possibly the most important aspect. In 2025, I used Yarnsmiths Create DK which is a 100% acrylic yarn. This was a great choice as Yarnsmiths is a brand that's readily available from Wool Warehouse, it has 120 shades to choose from, being acrylic means that it's durable yet soft enough for a blanket and it's easy on the price point too. This year, I'm using Yarnsmiths Merino DK. Again, this yarn is easy for me to get my hands on should I run out of any colours at any point, it has 120 shades to choose from and is a super soft, beautiful yarn. It is a little pricier than an acrylic yarn but I know that this is going to be a project that I will treasure long after it' completed so to me it's worth it. Selecting your colours When it comes to choosing your colours, you need to consider how you will be using colour in your blanket. For both of my blankets, colour is used to denote the star rating that I have given a book. Below you will can see the colours I chose last year vs this year. I have chosen less colours this year for two main reasons; one because I'm hoping the blanket will feel more cohesive with less colours, I'm not a huge fan of super colourful pieces (personal preference!). Two, it's easier to remember which colour I should be using when there are less of them! Other ways you could use colour: Different colour for the genre of the book read Colours to represent the book covers (great stash buster!) Each colour relates to the format e.g. Physical, audiobook, kindle, library etc Colour per month - great if you want to track how much you're reading at specific times throughout the year. Once you have chosen your colour palette you are ready to think about the layout or pattern for your book blanket. The Design For each of my blankets I have chosen to use granny squares (so that is what my directions will be for) but you could opt to do a ripple blanket, a granny stripe blanket, hexagons, C2C patchwork - whatever you like! I opted for granny squares because they are quick and easy to make, easy to store as I make a few at a time and also really easy to join together to create the overall blanket. It really is up to you what you choose but I do think a simple granny square blanket is the ideal option for beginners. Below you will find the written pattern that I use for a simple 4 round granny square using one colour. If you plan to use multiple colours then a pattern for that can be found here. Last year, I used the CJAYG method to join my squares as I made them and I will do the same again this year. It is my preferred method for joining squares together because it’s quick and easy, can be done a bit at a time and it looks great when using a contrast colour. If you wish to use a different method to join your squares then you absolutely can, it's whatever your preference is for the overall design. I'd set a goal of reading 75 books last year (I ended up reading 99!) so I had a rough idea of how to arrange my squares. I decided that each row would be 10 squares long. If you're planning to read more or less books then you could have the row be more or less squares. This is where the weight of yarn that you use comes into play too, a DK weight warn will create a smaller granny square than a chunky yarn would. If you were hoping to read 50 books in a year, then I would perhaps use an aran weight yarn with a 5.5 or 6mm crochet hook and work 5 rounds for each granny square instead of 4. I would then organise it as 7 or 8 squares per row, accepting that I would maybe have to add in some filler squares to even out the final row. I do include squares for any DNFs (Did Not Finish) so this alters the number of squares I have overall. The good thing with granny squares and the CJAYG method is that it's super easy to add squares to each row meaning you can make the blanket both wider and longer as you go if you need to. If the number of books you read in the year is not ‘enough’ to create a whole blanket then you could make filler squares in a neutral shade and alternate between a book square and a filler square. Another option would be to continue your project into the next year and keep adding to it until it’s the size you want. Alternatively, you could make your motifs bigger by adding more rounds or using chunkier yarn. This is your blanket, there is no right or wrong way to do it! Also it doesn’t have to be a blanket. Make it a granny square scarf or cushion cover instead! Granny Square Options If you do opt to use granny squares for your book blanket then there are a few different ways that you could do this. The easiest would be what I did last year - a 4 round granny square in one solid colour per book. Super easy to do, minimal ends to weave in, not too much thought involved and it gives a great overall finish. This year I am taking it up a notch and I'm making two different types of granny square. 5 round granny square for audiobooks Sunburst granny square for physical/kindle books All squares will be a singular colour showing its star rating. My reason for this is that last year I listened to A LOT of audiobooks and I would just like to see a visual representation of how I am consuming books this year. If you wanted to do something similar you could add in a third type of granny square (maybe a solid one) to differentiate between physical and kindle books. This isn't necessary but if you are someone who does read in multiple formats then it may be a fun way to record your reading habits. Granny Square Pattern Stitch Abbreviations (US Terms) MR - magic ring/magic circle DC - double crochet Sl st - slip stitch Ch - chain RS - right side WS - wrong side Pattern Notes: For both of my blankets I have used a DK weight yarn with a 4.5mm hook. You should use a hook size that compliments your chosen yarn. Ch2 at the start of the round does count as a stitch. You will be turning your work after every round. The Pattern: Make a magic circle. Round 1 (RS): Into the magic circle, ch2 (counts as a stitch here and throughout). Work 2 DC and ch1. Then work 3DC, ch1 repeating from to 2 more times. Sl st to top of ch2 to join. Turn your work. Note: At the end of this round you will have 4 clusters of 3DC and 4 ch1 spaces. The ch1 spaces are your corner spaces. Round 2 (WS): Ch2 and work 2 DC into the chain space at the base of the ch2. (This is the start of our first corner) [3DC, ch1, 3DC] into each of the next 3 ch1 corner spaces. 3DC into the final corner space (where you worked your initial ch2, 2DC) and ch1. Sl st to top of ch2 to join. (This completes the first corner) Turn your work. Note: At the end of this round you will have 8 clusters of 3DC and 4 ch1 corner spaces. Note: These photos only show a 3 round granny square but all rounds are worked in the same way. Round 3 (RS): Ch2 and work 2 DC into the chain space at the base of the ch2. 3DC into the space between clusters from previous round and work [3DC, ch1, 3DC] into the corner space Repeat from to 2 more times. 3DC into the space between the clusters from the previous round. 3DC into the final corner space and ch1. Sl st to top of ch2 to join. Turn your work. Note: At the end of this round you will have a total of 12 clusters and 4 ch1 corner spaces. Round 4 (RS): Ch2 and work 2 DC into the chain space at the base of the ch2. 3DC into each of the spaces between clusters from the previous round. [3DC, ch1, 3DC] into the corner space Repeat from to two more times. 3DC into each of the spaces between the clusters from the previous round. 3DC into the final corner space and ch1. Sl st to top of ch2 to join. Fasten off. Note: At the end of this round you will have a total of 16 clusters and 4 ch1 corner spaces. You can. find the pattern for the Sunburst Pattern here. Remember, you can find a detailed tutorial for joining your granny squares here. Books and Crochet If you love both books and crochet, which I'm assuming you do, then be sure to follow me on social media @Brambles.and.Hart I'll be sharing regular Book Blanket updates throughout the year including the books that I have been reading, which ones I'm loving and those not so much. I'll be doing a monthly wrap up post both on instagram and here on the blog. I track my reading on the Fable App and if you are interested in using that too then you can sign up and join me there! If you have any book recommendations for me then do let me know, I'm always looking to add to my TBR! If you decide to make a book blanket too then do tag me in your photos on social media @Brambles.and.Hart and use #BookBlanket If you would like to support me further and help me to keep creating free patterns and tutorials to share with you then do consider buying me a coffee on Ko-fi! Happy crocheting! Shelley ♡
- Candy Cane Lane Sweater - Free Pattern
Are you looking for an eye-catching Christmas Jumper to wear this festive season? Then I've got you covered! The Candy Cane Lane Sweater is made using chunky/bulky/5 weight yarn so it works up nice and quick. In a couple of evenings you can have this sweater finished ready to dazzle your friends and family at your work Christmas party or festive family get-together! Add Candy Canes to just the front or to the back too, it's completely your choice. Fancy adding something else alongside the Candy Canes? Then check out the Christmas Pick 'n' Mix Garland pattern which features 7 other festive motifs which you can use as appliques on your sweater. The Candy Cane Lane Sweater was previously published in issue 101 of Crochet Now magazine. Some slight adjustments have been made to the pattern here but overall it is the same. Now let's get to the pattern! Before you begin: You will need: Crochet hooks: 6.5mm and 7mm for the sweater (or size needed to obtain gauge) 4mm hook for the candy cane appliques Chunky/Bulky/5 weight yarn - See note below Aran/Worsted/4 weight yarn in white and red for the candy canes Tapestry needle Scissors Measuring tape Stitch markers Yarn note: For my sweater I used Stylecraft Special Chunky in Aspen (main colour) and Fondant (contrast colour). Whilst this is a chunky/bulky/5 weight yarn it is definitely on the lighter side so be sure to do a gauge swatch with your chosen yarn before you begin. Some thicker aran/worsted weight yarns may be appropriate substitutions. Stitch Abbreviations (US Terms) Ch - chain Sl st - slip stitch SC - single crochet HDC - half double crochet DC - double crochet BLO - in the back loop only HDC2TOG - half double crochet 2 together (decrease) Yardage For the jumper you will need the following number of 100g balls per colour. This is based off of the Stylecraft Special Chunky used for the sample sweater. Main Colour (5, 6, 7, 7, 8, 8, 9, 10, 10) balls Contrast Colour (2, 2, 2, 2, 2, 3, 3, 3, 3) balls For all sizes you will also need 1x 100g of aran weight yarn in white and some red yarn for adding on the stripes to the candy canes. Gauge Using chunky yarn and a 7mm hook. 10 HDC stitches x 9 rows = 10cm x 10cm (4" x 4") Measurements All measurements are given in cms. Finished Chest is measured from underarm to underarm with garment laid flat. Length is measured from neckline to bottom of jumper. Sleeves are measured from underarm to the end of the cuff. The jumper is designed with a positive ease of 13-19cm around the chest. In CM To Fit Chest (circumference) Finished Chest Length Sleeve X-Small 71-76 45 58 41.5 Small 81-86 50 58 42.5 Medium 91-97 55 60 42.5 Large 101-107 60 60 44.5 X Large 111-117 65 62 44.5 2X Large 122-127 70 62 44.5 3X Large 132-137 75 64 46 4X Large 142-147 80 65 48 5X Large 152-158 85 66 48 Pattern Notes: The Candy Cane Lane Sweater is made up of 4 pieces; the front panel, back panel and two sleeves. The ribbing and neckband are worked directly onto the jumper once all seaming has been completed. The sleeves are worked independently and then sewn onto the main body, therefore if you would like to follow the sleeve pattern for a different size this is easy to do. Ch1 does not count as a stitch. The stitch counts for each size will be given as follows: (XS, S, M, L, XL, 2X, 3X, 4X, 5X sts) If separate instructions are required for a specific size this will be made clear. Where only one stitch count is given this means that it is the same for every size. The length of the sweater is easily adjustable by repeating more or less of the HDC rows before the neck shaping. The Pattern: Back Panel Ch 46, 51, 56, 61, 66, 71, 76, 81, 86 Row 1 (RS): Starting in the 2nd ch from hook, HDC in each ch across. Ch1 and turn. (45, 50, 55, 60, 65, 70, 75, 80, 85 sts) Row 2 (WS): HDC in each st across. Ch1 and turn. (45, 50, 55, 60, 65, 70, 75, 80, 85 sts) Row 3 onwards: Repeat row 2 until you have 45, 45, 47, 47, 49, 49, 51, 53, 53 rows altogether. Fasten off. Note: If you wish to adjust the length of your sweater then you can do so by working more or less HDC rows. Just be sure to keep a note of how many rows you did so that you can match it for the front panel. I recommend working an odd number of rows so the RS/WS remains the same as in the pattern. Continue to Front Panel. Front Panel Work same as for back panel until you have 42, 42, 44, 44, 46, 46, 48, 50, 50 rows Note: If you modified your row count for the back panel then you will need to work HDC rows until you reach 3 less than your desired number. E.g. desired number of rows to match back panel 43, work to row 40. Neck Shaping (right hand side with sweater facing you) Row 1: HDC in the first 14, 16, 18, 20, 22, 24, 26, 28, 30 sts. HDC2TOG across the next 2 sts. Ch1 and turn. (15, 17, 19, 21, 23, 25, 27, 29, 31 sts) Row 2: HDC2TOG across the first 2 sts. HDC in each st across. Ch1 and turn. (14, 16, 18, 20, 22, 24, 26, 28, 30 sts) Row 3: HDC in the first 13, 15, 17, 19, 21, 23, 25, 27, 29 HDC. HDC2 TOG across the last 2 sts. (13, 15, 17, 19, 21, 23, 25, 27, 29 sts) Your total row count should be 45, 45, 47, 47, 49, 49, 51, 53, 53 the same as for the back panel. Fasten off leaving a 35cm tail for seaming. Neck Shaping (left hand side with sweater facing you) With RS facing, count 16, 18, 20, 22, 24, 26, 28, 30, 32 sts from the left and attach your yarn. Ch1 ready to begin the first row. Row 1: HDC2TOG across the first 2 sts. HDC in the next 14, 16, 18, 20, 22, 24, 26, 28, 30 sts. Ch1 and turn. (15, 17, 19, 21, 23, 25, 27, 29, 31 sts) Row 2: HDC across, HDC2TOG across the last 2 sts. Ch1 and turn. (14, 16, 18, 20, 22, 24, 26, 28, 30 sts) Row 3: HDC2TOG, HDC in eah st across. (13, 15, 17, 19, 21, 23, 25, 27, 29 sts) Fasten off leaving a 35cm tail for seaming. Sleeves (make 2) Cuffs: Using a 6.5mm hook and your contrast colour . Row 1: Ch 10. Starting in the 2nd ch from hook, sc in each st across. Ch1 and turn. (9 sts). Row 2: SCBLO in each st across. Ch1 and turn. (9sts). Row 3 onwards: Repeat row 2 until you have 18, 18, 20, 22, 24, 26, 28, 30, 32 rows. Join the ribbing by working a sl st in the BLO of the last row sts and the underside of the foundation chain. Turn your work so that you can work around the top edge of the cuff. HDC into the side of each row of ribbing. Sl st to join, Fasten off contrast colour. (18, 18, 20, 22, 24, 26, 28, 30, 32 sts) You are now going to be working in joined rounds. Continue to Sleeve. Sleeve Join main colour and switch to a 7mm hook. Round 1 (RS): HDC into the first st, 2HDC into the next st repeat from to around. Sl st to join, ch1 and turn. (27, 27, 30, 33, 36, 39, 42, 45, 48 sts) Rounds 2-6: HDC into each st around. Sl st to join, ch 1 and turn. (27, 27, 30, 33, 36, 39, 42, 45, 48 sts) Round 7 (RS) INC: 2HDC into the first st, HDC around, 2HDC into the last st. Sl st to join, ch1 and turn. (29, 29, 32, 35, 38, 41, 44, 47, 50 sts) Rounds 8-12: HDC into each st around. Sl st to join, ch1 and turn. (29, 29, 32, 35, 38, 41, 44, 47, 50 sts) Round 13 (RS) INC: 2HDC into the first st. HDC around, 2HDC into the last st. Sl st to join, ch1 and turn. (31, 31, 34, 37, 40, 43, 46, 49, 52 sts) Last INC round for size XS Rounds 14-18: HDC into each st around. Sl tst to join, ch1 and turn. (31, 31, 34, 37, 40, 43, 46, 49, 52 sts) XS Round 19: HDC into each st around. Sl st to join. ch1 and turn. (31 sts) Continue working rounds of HDC until you have 31 rounds in total. Fasten off leaving a 50cm tail. All other sizes Round 19 (RS) INC: 2HDC into the first st, HDC around, 2HDC into the last st. Sl st to join, ch1 and turn. (33, 36, 39, 42, 45, 48, 51, 54 sts) Rounds 20-24: HDC into each st around. Sl st to join, ch1 and turn. (33, 36, 39, 42, 45, 48, 51, 54 sts) Round 25 (RS) INC: 2HDC into the first st, HDC around, 2HDC into the last st. Sl st to join, ch1 and turn. (35, 38, 41, 44, 47, 50, 53, 56 sts) Last INC round for S, M, L, XL Rounds 26 - 31: HDC in each st around. Sl st to join, ch1 and turn. (35, 38, 41, 44, 47, 50, 53, 56 sts) Size S fasten off leaving a 55cm tail. Sizes M, L XL work rounds of HDC until you have a total of 33, 33, 34 rounds. Fasten off leaving a 55cm tail. 2X, 3X, 4X, 5X continue Round 32 (RS) INC): 2HDC into the first st, HDC around, 2HDC into the last st. Sl st to join, ch1 and turn. (49, 52, 55, 58 sts) (This is an optional increase round, you can replace with a standard HDC round if you wish) Round 33 onwards: HDC in each st around. Sl st to join, ch1 and turn. (49, 52, 55, 58 sts) Repeat until you have a total of 35, 35, 36, 36 rounds. Fasten off leaving a 65cm tail. Continue to seaming. Seaming Notes before you begin: The Right Sides of your work will always be facing each other. If you haven’t already, it’s a good idea to mark the RS of both your panels with a stitch marker. I recommend whip stitching as the seaming method but please feel free to do whatever you are most confident with if you usually use a different method. Before you begin seaming your panels together, lay your front panel down flat and line up your sleeves so that you can mark where your arm holes need to begin (the end tail of each sleeve should be orientated to the underside centre so that it will be inline with the seam). Main Body Lay your front and back panels side by side, WS facing you, with the shoulders lined up. If you are leaving a Thread your tapestry needle with a long tail, approximately 80-100cm (rather too much than not enough) and work the needle through the very edge of both panels from right to left, tying a knot to secure. You will then whip stitch your two panels together until just before the stitch marker denoting where your armhole will begin. Do not fasten off your yarn just yet incase you need to adjust your seam. Flip your work over and bring the two unjoined edges together, the WS of each panel should now be facing you, repeat the instructions for seaming on this side also. Shoulders Using the long tails left from the neck shaping, whip stitch your along the length of your shoulders. Fasten off. Sleeves With the WS of your jumper facing you, insert your first sleeve through the armhole and line up the sleeve to the armhole. It should fit neatly without the need to stretch out the sleeve or the armhole too much. If your side seam needs increasing or pulling back adjust as needed. Using the long tail left on sleeve, whip stitch around the armhole and the opening of your sleeve. You want to ensure that you work through each stitch of the sleeve. Fasten off and repeat for the second sleeve. Turn your jumper the right way out and double check that the RS of both panels and your sleeves are now facing you. Continue to Ribbing. Finishing Touches Both the ribbing and the neckband will be worked in your contrast colour and will use a 6.5mm hook. Ribbing - Hem With the RS of your sweater facing you, attach your contrast colour to the centre of one of the side seams. Ch1 and SC in each st around the bottom of your jumper. Sl st to join and ch 14 Row 1: Starting in the 2nd ch from hook, sc in each st across. Ch1 and turn. Sl st into the first st and again into the second st along. Ch1 and turn. (13 sts) Row 2: SCBLO in each st across of your previous row. Ch1 and turn. (13 sts). Row 3: SCBLO into each st across. Sl st into the next 2 sts across. Ch1 and turn. (13 sts) Repeat rows 2 and 3 all around the bottom hem of the sweater then join the ribbing by working a sl st in the BLO of the last row sts and the underside of the foundation chain. Fasten off. Neckband Join your yarn to the centre stitch of your back panel and ch1. SC in each st around, working 2SCTOG across the corners where the neck shaping joins the front panel. Sl st to join and Ch 20. Row1: Starting in the 2nd ch from hook, sc in each st across. Ch1 and turn. Sl st into the first st and again into the second st along. Ch1 and turn. (19 sts) Row 2: SCBLO in each st across of your previous row. Ch1 and turn. (19 sts). Row 3: SCBLO into each st across. Sl st into the next 2 sts across. Ch1 and turn. (19 sts) Repeat rows 2 and 3 around your neckband until you are back to your first row. Join the ribbing by working a sl st in the BLO of the last row sts and the underside of the foundation chain. Note: If you would like a single layer neckband or a much smaller neckband then simply alter the number of chains you do and work accordingly. Fold over your neckband and weave in all of your ends - your sweater is complete! Adding the Appliques The amount of candy canes (or other motifs) that you choose to add to your sweater is up to you. For the sample sweater I made 6 'right curve' candy canes and 3 'left curve' candy canes and only added them to the front of the sweater. If you want to add them all over then you can make more. To attach the appliques, either sew them on using the same colour yarn or you can use a hot glue gun to attach them (my preferred method but I know it's nopt for everyone!) Candy Canes Right Curve DC into the 3rd ch from the hook and into the next 11 sts. 3DC into the next st. Work 2TR into each of the next 6 sts. Place a DC into the final st. Ch2 and sl st into the final chain. Fasten off white. Left Curve DC into the 3rd chain from the hook. Work 2TR into each of the next 6 sts. 3DC into the next st. DC into the remaining 12 sts. Ch2 and sl st to the final chain. Fasten off white. Adding stripes Thread Crimson yarn through a tapestry needle. Starting at the bottom, insert needle from the back and insert through a stitch diagonally on the opposite side. To try and keep the stripes evenly spaced, work the red yarn through every other stitch on the inside of the candy cane and the 2nd or 3rd st of the outside. Congratulations, you have completed your Candy Cane Lane Sweater and are ready to dazzle this festive season! I really hope that you enjoyed making this free pattern. I'd love to see your work so please do tag me in your posts on social media @Brambles.and.Hart and use the hashtags #BHFreePatternMakes #BramblesandHart If you are not already following me on social media then what are you doing?! I'd love to see you over on Instagram @Brambles.and.Hart, you can also follow me on TikTok (although I'm not particularly active there currently) and do subscribe to my YouTube Channel which will see a little revival in the new year! Happy crocheting! Shelley ♡
- Pick 'n' Mix Garland (Pt 2) - Free Pattern
Here is part 2 of the Christmas Pick 'n' Mix Garland! If you missed Part 1 you can find that here. In Part 1 you can find the instructions for the following motifs: Mini Xmas Wreath Holly Stars (small and large) Santa Hat In Part 2 (this blog post) you will find the instructions for these motifs: Candy Cane Snowflake Christmas Tree Xmas bauble If you would like to have the full instructions for all 8 motifs (plus an exclusive 9th motif - gingerbread man!) and instructions for turning them into a garland, all in one place then you can purchase the inexpensive PDF pattern on my website or Etsy. Use code XMASBLOG to receive 20% off ! Whether you want to have one or two of each motif on your garland or Pick 'n' Mix your favourite ones that is completely up to you! I have stuck with traditional Christmas colours of reds and greens as I do love a classic Christmas colourway but you can express your own festive style with whatever colours you choose! The pattern below will show you how to make each of the motifs (Candy Cane, Snowflake, Chritmas Tree and Xmas Bauble) individually plus how to join your motifs together to form your garland. (Click here if you're ready to jump to that part!) Let's get to the pattern! Before you begin: You will need: Aran/worsted/4 weight cotton yarn or yarn of your choosing 3.5mm and 4mm hook (or hook 1mm smaller than that suggested for the yarn) Scissors Tapestry needle Notes on yarn choice: Here I am using Yarnsmiths Cotton Aran in colours Clover, Christmas Green (darker). Crimson, Claret Red (darker), Mustard Yellow and White. Whilst I have used cotton yarn for my motifs you do not have to however, acrylic yarn may not be as sturdy. If you find that your motifs are a little floppy I would suggest sizing down your hook. Using different weight yarns such as DK/light worsted or Super chunky yarn and their corresponding hooks would allow you to alter the size of the motifs to be larger or smaller. Stitch Abbreviations (US Terms) Ch - chain MR - magic ring/magic circle SC - single crochet HDC - half double crochet DC - double crochet 2TOG - two stitches worked together to decrease Sl st - slip stitch St/s - stitch/es RS - right side WS - wrong side Pattern Notes: Any special stitches required will be listed at the start of the pattern for the motif on which they are used. Starting chains do not count as a stitch unless specified. The patterns below are written with directions for the colours I have used, you can of course substitue the colours for whatever you would like to use. The Patterns: Candy Cane Using White and a 3.5mm hook, ch22 You can make two different Candy Canes, one where the curve goes to the left and one to the right. Make a few of each or just the one you prefer! Right Curve DC into the 3rd ch from the hook and into the next 11 sts. 3DC into the next st. Work 2TR into each of the next 6 sts. Place a DC into the final st. Ch2 and sl st into the final chain. Fasten off white. Left Curve DC into the 3rd chain from the hook. Work 2TR into each of the next 6 sts. 3DC into the next st. DC into the remaining 12 sts. Ch2 and sl st to the final chain. Fasten off white. Adding stripes Thread Crimson yarn through a tapestry needle. Starting at the bottom, insert needle from the back and insert through a stitch diagonally on the opposite side. To try and keep the stripes evenly spaced, work the red yarn through every other stitch on the inside of the candy cane and the 2nd or 3rd st of the outside. Photo shows Right Curve candy cane Snowflake Using White and a 4mm hook, make a magic ring Round 1; Into the MR, work [DC, ch2] 6 times. Sl st to first DC to join. (6 DC and 6 ch spaces) Round 2: *Ch6, sl st into 2nd st and next st along. Ch2 and DC into final ch. Sl st to next DC along (from round 1) to join*. (First point complete) Repeat from * to* five more times. Sl st to top of first DC from the first round (where point one began) to join. You will have 6 points in total. Fasten off and weave in your ends. Christmas Tree Using Christmas Green and a 4mm hook, ch3 Tree Row 1; Into the 3rd chain from the hook, work 2 HDC. Ch1 and turn. (2 sts) Row 2: 2HDC into each st along. Ch1 and turn. (4 sts) Row 3: HDC into each st along. Ch1 and turn. (4 sts) Row 4: 2HDC into first st, HDC along until 1 st remains, 2HDC into final st. Ch1 and turn. (6 sts) Rows 5 - 8: Repeat rows 3-4 twice. (10 sts) Row 9: SC into each st along. (10 sts) Fasten off green. Stump Attach brown yarn to the 4th st along. Row 1: Ch1 and HDC into same st and next 2sts along. Ch and turn. Row 2: HDC into each st along. Fasten off brown. Star Picot - ch3, sl st into 3rd chain from hook Using Mustard Yellow and a 4mm hook, make a magic ring Into the magic ring *SC, picot* 5 times. Sl st to first SC to join. Fasten off yellow leaving long tail to sew star to tree. Attach star to top of the tree and then weave in all of your ends. Xmas Bauble Using Crimson and a 4mm hook, make a magic ring Round 1: Into the MR, work 11 HDC. Sl st to first HDC to join. (11 sts) Round 2: Ch1, 2HDC into each st around. Sl st to first HDC to join. (22 sts) Round 3: Ch1, *HDC into first st, 2HDC into next st* repeat around. Sl st to first HDC to join. (33 sts) Fasten off red. Hanging Attach Mustard Yellow to one HDC and ch1. Row 1: SC into same st and next 2 sts along. Ch1 and turn. (3 sts) Row 2: SC into each st along. Turn. (3 sts) Ch4 and sl st to last SC along to join. Fasten off yellow and weave in all ends. Joining the Garland These instructions show how to simply join your motifs together to create a garland. You can make your garland as long or as short as you like depending on where you plan to hang your garland and of course how many motifs you plan to add. When you are deciding on the order in which to have the motifs on your garland remember that when you join them you will be doing so from right to left. Taking your chosen yarn and a 4mm hook, ch15. This will be the starting chain of your garland, you can of curse make this longer or shorter if you wish. 2. Take your first motif and sl st to the top of the motif then ch17. This will be the space between your motif. You may wish to alter this to accommodate larger or smaller motifs. For example, the Holly Leaves will take up more space than the small star. 3. For every new motif you add, sl st to the top and then ch17 (or your chosen amount) between them. After attaching your final motif, ch15 or the same amount as you did at the start and fasten off. 4. You can either weave in the two ends or simple trim them short. Gingerbread man pattern available in the PDF. And there you have your completed Christmas Pick 'n' Mix Garland! I'd love to see your work so please do tag me in your posts on social media @Brambles.and.Hart and use the hashtags #BHFreePatternMakes #BramblesandHart If you are not already following me on social media then what are you doing?! I'd love to see you over on Instagram @Brambles.and.Hart, you can also follow me on TikTok (although I'm not particularly active there currently) and do subscribe to my YouTube Channel which will see a little revival very soon! If you would like to support me further and help me to keep creating free patterns and tutorials to share with you then do consider buying me a coffee on Ko-fi! Happy crocheting! Shelley ♡
- Christmas Pick 'n' Mix Garland (Pt 1) - Free Pattern
One of my favourite ways to add a bit of crochet to my seasonal home decor is with a garland. I have patterns for Spring and Autum/Halloween garlands but have yet to create one for Christmas. That is until now! When I sat down to start designing my perfect Christmas garland I had so many ideas for motifs that I could include. Initially, I tried to narrow it down to just two or three different ones but at Christmas we're allowed to indulge and be a bit excessive and over the top aren't we? It's Christmas! As I have quite a few. motifs to include in the pattern and wanted to be able to provide some photo support for each motif, I have split this pattern into two parts. In Part 1 (this blog post) you can find the instructions for the following motifs: Mini Xmas Wreath Holly Stars (small and large) Santa Hat In Part 2 (available here) you will find the instructions for these motifs: Snowflake Candy Cane Christmas Tree Xmas bauble If you would like to have the full instructions for all 8 motifs (plus an exclusive 9th motif - gingerbread man!) and instructions for turning them into a garland, all in one place then you can purchase the inexpensive PDF pattern on my website or Etsy. Use code XMASBLOG to receive 20% off ! Whether you want to have one or two of each motif on your garland or Pick 'n' Mix your favourite ones that is completely up to you! I have stuck with traditional Christmas colours of reds and greens as I do love a classic Christmas colourway but you can express your own festive style with whatever colours you choose! The pattern below will show you how to make each of the motifs (Mini Xmas Wreath, Holly, Stars and Santa Hat) individually. Let's get to the pattern! Before you begin: You will need: Aran/worsted/4 weight cotton yarn or yarn of your choosing 4mm hook or hook 1mm smaller than that suggested for the yarn Scissors Tapestry needle Notes on yarn choice: Here I am using Yarnsmiths Cotton Aran in colours Clover, Christmas Green (darker). Crimson, Claret Red (darker), Mustard Yellow and Cream. Whilst I have used cotton yarn for my motifs you do not have to however, acrylic yarn may not be as sturdy. If you find that your motifs are a little floppy I would suggest sizing down your hook. Using different weight yarns such as DK/light worsted or Super chunky yarn and their corresponding hooks would allow you to alter the size of the motifs to be larger or smaller. Stitch Abbreviations (US Terms) Ch - chain MR - magic ring/magic circle SC - single crochet HDC - half double crochet DC - double crochet 2TOG - two stitches worked together to decrease Sl st - slip stitch St/s - stitch/es RS - right side WS - wrong side Pattern Notes: Any special stitches required will be listed at the start of the pattern for the motif on which they are used. Starting chains do not count as a stitch unless specified. The patterns below are written with directions for the colours I have used, you can of course substitue the colours for whatever you would like to use. The Patterns: Mini Xmas Wreath Using Christmas Green and a 4mm hook, ch15 and sl st to the first chain to create a circle. Be careful not to twist the chain. Round 1 (RS): Work 20 HDC over the chain. Sl st to the first HDC to join. Do not chain, instead pull your loop up to the height of a HDC. (20 sts) Round 2 (WS): *HDC into the first st, 2HDC into the next stitch* Repeat this around, sl st to first HDC to join. (30 sts) Fasten off and weave in your ends. Adding the bow: Take a long piece of yarn in Crimson (red) and thread it onto a tapestry needle. Insert the needle through the space between the stitches (see photo) from the front leaving a long tail. Weave your needle in and out of the stitches all the way around until you meet the beginning again. Ensure that you pull your yarn back through to the front. Tie a little bow, turning your wreath around if you would like the bow at the bottom like I have, otherwise you can keep it at the top. Trim off the ends. Note: this is the fiddliest part of the pattern! Tie a large bow and then pull the two tails to decrease the size of the loops, you can then trim off the excess tails. Holly Leaves & Berries Special stitches: Picot - ch3, sl st into the 3rd ch from the hook. Bobble stitch (DC5TOG) - YO and insert your hook into the magic ring, pull up a loop (3 loops on hook). YO and pull through two loops (2 loops on hook). *YO and insert hook into magic ring, pull up a loop. YO and pull through two loops* Repeat until you have 6 loops on your hook. YO and pull through all loops. Holly leaves: Make 2 Using Christmas Green and a 4mm hook, ch10 Round 1: SC into the 2nd chain from your hook. Then work the following; 2 HDC, DC, 2DC into the next st, DC, 2 HDC and 3 SC into the final st. (12 sts so far) This will begin to turn your work slightly, let it as you will now work back along the underside of chain. 2 HDC, DC, 2DC into the next st (this will be the same st as the 2DC from the previous row), DC, 2 HDC, and SC in the last ch. Sl st into the first SC., This brings you back around to your first side. Round 2: Skip the stitch into which you sl stitched and work a SC inot the next st. Picot st from that SC. SC in the next st and sl st into the following st. (first point created). *(SC, picot) into the next st, followed by a SC and a sl st* repeat from *to* 4 more times. To create your final point, (SC, picot), SC and then sl st into the final st. You will have a total of 7 picot points. Fasten off. Note: Before you fasten off your second leaf, place it over the top of your first one at an andle (see photo) and sl st through the first leaf to join the two together and then fasten off. Berries: Using Crimson and a 4mm hook, create a magic ring. Ch1 and into the magic ring, work a *bobble st, ch1* repeat two more times, pulling the tail of the magic ring to tighten before you work your third and final bobble stitch. Pull tail to full close magic ring and sl st to first bobble st to join. Fasten off, leaving a long tail for joining to the leaves. Joining together: Insert the tail of the berries through the top of the leaves where they are joined together. Move the pieces about slightly until they are how you would like them to look and then sew the berries onto the leaves. Weave in any ends. Stars Using your chosen colour and a 4mm hook, make a magic ring. Small Star Into the MR work 10 HDC. Sl st to first st to join. *Ch 4, SC in 2nd chain from the hook. HDC into next ch, DC into last ch. Skip one st, sl st to next HDC along.* Repeat 4 more times to complete the star. Fasten off and weave in your ends. Large Star Into a MR work 15 DC. Sl st to first st to join. *Ch 5, SC in 2nd chain from the hook. HDC into next ch, DC into next ch, TR into final ch. Skip one st, sl st to next DC along.* Repeat 4 more times to complete the star. Fasten off and weave in your ends. {Photos below shows large star} Santa Hat Using Claret Red and a 4mm hook, ch3. Hat Row 1: HDC into the 2nd chain from the hook and into the final chain. Ch1 and turn. (2 sts) Row 2: 2HDC into each of the two sts. Ch1 and turn. (4 sts) Row 3: HDC into each st along, ch1 and turn. (4 sts) Row 4: 2HDC into the first st, HDC in each st until one st remaining, 2HDC into the final st. (6 sts) Row 5: HDC into each st along, ch1 and turn. (6 sts) Rows 6 -7: Repeat rows 4 and 5. (8 sts) Row 8: Repeat row 4 (10 sts) Fasten off Claret Red and attach Cream. Row 9: SC into each st along. Ch 1 and turn. (10 sts) Row 10: *DC into the first st, SC into the next st* repeat along. (10 sts) Turn your work so that the textured (bumpy) side of the final row is facing you. This is the RS of your hat. Fasten off Cream. Pompom Using Cream, make a magic ring. Into the MR, *DC, SC* 5 times. Sl st to first st to join. (10 sts) Turn your work so that the textured (bumpy) side is facing you. This is the RS of your pompom. Fasten off leaving a long tail to sew onto hat. Sew the pompom onto the tip of the hat (or use a hot glue gun!) ensuring that the RS of each are facing the same way. Then weave in any ends. That's the first 4 motifs complete! be sure to check back to the blog next week for the remaining 4 motifs and how to join your motifs together! Coming next week: Snowflake Candy Cane Christmas Tree Bauble I'd love to see your work so please do tag me in your posts on social media @Brambles.and.Hart and use the hashtags #BHFreePatternMakes #BramblesandHart If you are not already following me on social media then what are you doing?! I'd love to see you over on Instagram @Brambles.and.Hart, you can also follow me on TikTok (although I'm not particularly active there currently) and do subscribe to my YouTube Channel which will see a little revival very soon! If you would like to support me further and help me to keep creating free patterns and tutorials to share with you then do consider buying me a coffee on Ko-fi! Happy crocheting! Shelley ♡
- Easy Granny Square (with colour changes) - Free Pattern
One of the most common questions I get asked is 'Do you have a granny square pattern?' I've shared lots of content over the last year for projects that use granny squares such as my book blanket and granny square jumper (pattern in process!) and I always get asked how I do my granny squares, do I have a pattern or tutorial. I've previously sent people DMs with a quick outline of how I do my granny squares or referred the to YouTube where you can find a plethora of granny square tutorials but I have now decided that it's time I share my own. Over the last 8 or so years that I've been crocheting, I've made many projects that use granny squares, followed patterns and tutorials and I've realised that so many people have a different approach. Ask 5 crocheters how they make their granny squares and you'll likely get 5 slightly different responses! With that being said, this pattern/tutorial will be for how I personally like to make my granny squares. If you find that this doesn't feel right for you then there are many other tutorials available 🙂. Now let's get to the pattern! Before you begin: You will need: Any yarn you choose in 4 different colours- for this tutorial I am using Yarnsmiths Create Aran in Christmas Green, Claret, Light Sage and White A hook the size recommended for your yarn - I am using a 5mm crochet hook Scissors Tapestry needle Stitch Abbreviations (US Terms) MR - magic ring/magic circle DC - double crochet Sl st - slip stitch Ch - chain RS - right side WS - wrong side Pattern Notes: Ch2 at the start of the round does count as a stitch. You will be turning your work after every round. You will be changing colour every round (although this is totally optional!) I recommend joining your new colour in a different corner to where you fastened off your previous colour. The Pattern: With colour 1 make a magic circle. Round 1 (RS): Into the magic circle, ch2 (counts as a stitch here and throughout). Work 2 DC and ch1. Then work *3DC, ch1* repeating from *to* 2 more times. Sl st to top of ch2 to join. Fasten off colour 1 Note: At the end of this round you will have 4 clusters of 3DC and 4 ch1 spaces. The ch1 spaces are your corner spaces. Turn your work over and join colour 2 to the corner space opposite where you fastened off colour 1. Round 2 (WS): Ch2 and work 2 DC into the chain space at the base of the ch2. (This is the start of our first corner) [3DC, ch1, 3DC] into each of the next 3 ch1 corner spaces. 3DC into the final corner space (where you worked your initial ch2, 2DC) and ch1. Sl st to top of ch2 to join. (This completes the first corner) Fasten off colour 2. Note: At the end of this round you will have 8 clusters of 3DC and 4 ch1 corner spaces.. Turn your work over and join colour 3 to one of the free corners (no previous colour change). Round 3 (RS): Ch2 and work 2 DC into the chain space at the base of the ch2. *3DC into the space between clusters from previous round and work [3DC, ch1, 3DC] into the corner space* Repeat from *to* 2 more times. 3DC into the space between the clusters from the previous round. 3DC into the final corner space and ch1. Sl st to top of ch2 to join. Fasten off colour 3. Note: At the end of this round you will have a total of 12 clusters and 4 ch1 corner spaces. Turn your work over and join colour 4 to one of the free corners (no previous colour change). Round 4 (RS): Ch2 and work 2 DC into the chain space at the base of the ch2. *3DC into each of the spaces between clusters from the previous round. [3DC, ch1, 3DC] into the corner space* Repeat from *to* two more times. 3DC into each of the spaces between the clusters from the previous round. 3DC into the final corner space and ch1. Sl st to top of ch2 to join. Fasten off colour 4. Note: At the end of this round you will have a total of 16 clusters and 4 ch1 corner spaces. Weave in all of your ends, if your project will have a 'right side' then try to weave in all of your ends on the same side of your work, the 'wrong side'. Making a larger Granny Square. If you want to make your granny squares larger, for example to keep going to make a traditional granny square blanket then absolutely you can do that! Simply keep working in rounds the same as you have been here, turning your work after each round and alternating where you join your new colour. With each round that you add you will have an extra space between clusters to work into. Your four corners will remain the same, work (3DC, ch1, 3DC) into each one. Your total number of clusters will increase by 4 with each round. If you feel that you may have skipped a space or added in an extra cluster you can always count them, each side will have the same number of clusters as the number of rounds you have. e.g. round 3 will have 3 clusters per side (see photo) and round 11 will have 11 clusters per side and so on. Frequently Asked Questions Q. Why do you turn after each round? A. I personally choose to turn after each round because I find that it helps to keep my granny squares square and stop the spiralling effect that you can sometimes get when not turning. Turning after each round is helpful if your project will not have a set right or wrong side, for example with a blanket where both sides will be seen. It also creates a subtle texture to the granny square which I like. Q: Why do you join the new colour to a different corner? A. Where you join your yarn when adding a new colour will be where you both start and end your round so you will have a starting tail and an end that require weaving in. If you have all of these ends at the same corner of your granny square then it will add a bit of bulk. Attaching the yarn to different corners each time spreads out where the ends will be weaved in. Alternating corners also helps prevent a visible seam. Q. Do I have to change colours every round? A. Absolutely not! You can make you rgranny squares in a solid colour or perhaps you're using a variegated/colour changing yarn where you don't need to physically change the colour yourself. In that case, just keep on going with the yarn you have. If you are making a larger granny square blanket then I would maybe fasten off every 10 rounds or so just to prevent the visible seam. If you are using more than one colour then play around with your colour changes, maybe you want thinker bands of colour so change colour every 5 rounds or have irregular colour changes. It's completely up to you, your personal style and the project you're working on. ----- Granny squares are quite possibly the first thing that comes to mind for people when they think crochet and for good reason! They're a classic crochet pattern, they're versatile and can be used for everything from blankets to sweaters to bags and they look amazing in every possible colourway. Whilst they can be intimidating for beginners and take a bit of practice, once you've cracked it they become the perfect, mindful make. I love to work on a simple granny square when I just want to shut off my brain for half an hour and unwind. I hope that this pattern helps you to make your first and your hundreth granny square! I'd love to see your work so please do tag me in your posts on social media @Brambles.and.Hart and use the hashtags #BHFreePatternMakes #BramblesandHart If you are not already following me on social media then what are you doing?! I'd love to see you over on Instagram @Brambles.and.Hart, you can also follow me on TikTok (although I'm not particularly active there currently) and do subscribe to my YouTube Channel which will see a little revival very soon! If you would like to support me further and help me to keep creating free patterns and tutorials to share with you then do consider buying me a coffee on Ko-fi! Happy crocheting! Shelley ♡
- Bear Ears (Beanie Add-On) - Free Pattern
Beanie season is upon us, quite possibly the best season of the year! It's no secret that I love a beanie. I love to wear them, crochet them and make cute ones for my boys. I have quite a few beanie patterns including the ever popular Dino Beanie and Pumpkin Beanie. The Dino Beanie pattern includes a base hat pattern written for aran/worsted weight yarn and also chunky/bulky weight yarn plus the instructions for the dinosaur spikes. You can then also purchase the Add-on pattern for the Hart (Reindeer) which includes cute ears and antlers (or vise versa, grab the full Hart Beanie pattern and the Dino Spike Add-ons). Both have proven super popular and I love the idea of having a simple ribbed beanie as a base pattern which you can then customise in multiple ways. Grab 15% off of the full Hart or Dino Beanie patterns here or on Etsy, using code BEAREARS 🤎 This pattern for the cute Bear Ears Add-ons is the first in a little collection of patterns that I'll be creating and releasing which will provide multiple different ways for you to elevate the simple, yet classic ribbed beanie. Now let's get to the pattern! Before you begin: You will need: Small amount of Aran/worsted or chunky/bulky weight yarn (whichever yarn you used to make your beanie) in 2 different colours - inner ear and outer ear. A hook 0.5mm smaller than that recommended for your yarn Scissors Tapestry needle For my Bear Ears I have used Paintbox Simply Aran in Soft Fudge and Yarnsmiths Create Aran in Parchment with a 4.5mm crochet hook. Stitch Abbreviations (US Terms) MR - magic ring/magic circle SC - single crochet HDC - half double crochet DC - double crochet Sl st - slip stitch Ch - chain Pattern Notes: Ch1 at the start of a round does not count as a stitch. You will not turn your work at any point, both the inner and outer portion of the ear are made in the round without the need to turn. The right side (RS) of your work is the side facing you as you crochet. When joining the two sections of the ear together, you will want the RS of each piece to be facing outwards. This will have the RS of the outer ear facing the back and the RS of the inner ear facing the front when you look at your completed ear. The Pattern: Outer Ear - make 2 Using your Outer Ear colour, make a MR and ch1. Round 1: Into your MR, work 8 DC. Sl st to first st to join. Ch1 and do not turn. (8 sts) Round 2: 2DC into the first 6 sts. 2HDC into both of the remaining 2 sts. Sl st to first st to join. Ch1 and do not turn. (16 sts) Round 3: (HDC into the first st, 2HDC into the next st), repeat this 5 more times. HDC into the next st. You should have 3 sts remaining. 2SC, SC, 2SC across the last 3 sts. Sl st to first st to join. (24 sts) Fasten off leaving a long tail for attaching the ear to the beanie. Note: Where we have just worked the 2SC, SC, 2SC, this is the bottom of your outer ear and will be the section you sew onto your beanie. Inner Ear - make 2 Using your Inner Ear colour, make a MR and ch1. Round 1: Into your MR, work 8 DC. Sl st to first st to join. Ch1 and do not turn. (8 sts) Round 2: 2HDC into the first 6 sts. 2SC into both of the remaining sts. Sl st to first st to join. Ch1 and do not turn. (16 sts) Fasten off leaving a long tail for attaching the ear to the beanie. Note: Where we have just worked the two 2SC, this is the bottom of your inner ear and should be lined up with the bottom of your outer ear when joining them together. Constructing the Ears Lay the inner ear inside the outer ear, with the RS of each piece facing out. Have the tails to the right-hand side so that the bottom section of both pieces are lined up. Using the tail from the inner ear, sew the two pieces together. Work through the back loop only of the stitches of the inner ear and under the 3rd loop of the outer ear (see photo). This will prevent your stitches from being visible once the ear is complete. For every third stitch of the inner ear, you will want to skip one stitch on the outer ear as the stitch counts are not the same. If you don't do this perfectly don't worry, it won't matter too much just get it as close as possible. Once you have finished the ear should naturally curl in slightly and this is exactly what you want. Weave in the end by working the tapestry needle underneath the inner ear, taking care to not go through the outer ear. This way the end will be hidden on the inside of the ear. Use the tail from the outer ear to attach your finished ears to your beanie and you are all done! I really hope that you enjoyed making this free pattern. I'd love to see your work so please do tag me in your posts on social media @Brambles.and.Hart and use the hashtags #BHFreePatternMakes #BramblesandHart If you are not already following me on social media then what are you doing?! I'd love to see you over on Instagram @Brambles.and.Hart, you can also follow me on TikTok (although I'm not particularly active there currently) and do subscribe to my YouTube Channel which will see a little revival very soon! Happy crocheting! Shelley ♡
- 7 Reasons Why I Crochet and You Should Too!
*This posy may contain affiliate links It’s no secret that I am crochet obsessed. From the moment I picked up a hook, 8 years ago (wow!), I completely fell in love with this craft and there's hardly a day that goes by where I don't pick up my hook. There’s something so special about slowing down and making something with your own two hands. Whether you’re a busy mum carving out a few minutes of quiet time, seeking a way to ease stress and anxiety or someone looking for a new creative hobby, crochet offers so much more than just playing withe a ball of yarn and a hook. Here are SEVEN reasons I think you should give it a go, even if you’ve never picked up a hook before. 1. It Sparks Your Creativity You don’t need to be “artistic” to enjoy crochet. I definitely would never have described myself as artistic or creative before I began crocheting and honestly it’s not really how I’d describe myself now! The real joy of crochet is in the process; picking colours, choosing the yarn, learning new stitches and techniques, watching something grow from your hook one stitch at a time. As you go, you'll find yourself experimenting with different project types and yarns, developing your own style and with every project you finish your confidence will grow. Even those questionable first attempts are something to be proud of! (I always remember my first attempt at an amigurumi dragon and my husband saying it looked like a cock sock 😂 It’s safe to say my amigurumi skills never really improved) 2. It’s an Affordable Hobby (or as affordable as you make it!) Unlike many hobbies that require lots of expensive tools or materials, crochet is super accessible. A single hook and a ball of yarn are all you need to get started. Nowadays you can find these pretty much anywhere - I saw yarn in my local Tesco yesterday! B&M, Home Bargains, The Range and Poundland all sell yarn and crafting materials, you can head to Hobbycraft if you have one locally and don’t forget your local yarn stores! Of course, you can order from online craft stores such as Wool Warehouse and LoveCrafts or even Amazon but with minimum spends for free delivery you may end up spending more money than necessary. When you are first starting out you can often reuse yarn or repurpose materials as you go. Frog a swatch once you’ve completed it and then practice another stitch. Once your skills improve and you feel ready t o tackle a project then you can buy more yarn, experiment with different hooks sizes and brands etc but still you can keep it as affordable as you want to. Don’t let anyone convince you that you need an entire set of £30 each hooks and to only use £25 a hank hand-dyed yarn for your projects - yes these things may be beautiful but if you can’t afford them or simply don’t want to use them then don’t! (I personally don’t find the fancy ‘ergonomic’ hooks comfortable to crochet with!) Use the yarn, hooks and notions that are within your budget - there’s no yarn snobbery here! 3. It Teaches Patience and Promotes Lifelong Learning Crochet is relatively easy to start but it never gets boring as there is always something new to learn and ways you can improve. Whether it’s a learning a new stitch you’ve never tried before, tackling your first garment or amigurumi project or learning to read patterns so you’re not totally reliant on YouTube tutorials, you’re always learning and there’s always something new to challenge yourself with. As an ex-teacher I am hugely passionate about encouraging a love of learning and crafts can be a great way to do just that! As you experiment with your crocheting and work to improve your skills mistakes will inevitably happen, and as frustrating as frogging (pulling back your work) and starting over is you do learn to embrace it as part of the process. As previously mentioned, crochet is a slower craft and your perseverance builds patience and resilience which are skills you can use in your daily life not just when crocheting! 4. It Builds Confidence and a Sense of Achievement As you learn and your skills improve you’ll find your confidence starting to increase. You begin to challenge yourself to try a new stitch or technique and when it finally clicks - it’s absolute magic! Every time you finish a project, even a small one, it feels amazing and you have that sense of ‘I made that!’ I think that’s really special. Crochet gives you tangible proof of progress, compare your first project to your tenth and you’ll be amazed by the difference. Each stitch is a step forward, and every piece is something to be proud of. 5. You Can Make Beautiful, Practical Things You Can Use! One of the best things about crochet is that it’s practical and beautiful. Your time and effort results in something that can bring you joy for years to come. From cosy blankets and baby bonnets to cardigans, hats and market bags - there’s no better feeling than using something you made with your own two hands. And handmade gifts? Always a winner! Crocheting is a slower, more thoughtful way to create the things you and your family need. Could I buy my boys new hats from Primark every winter? Sure, but then I wouldn’t get the warm and fuzzies every time I see them wearing it like I do when they’re wearing a beanie I made for them with love. 6. It’s a Gentle Way to Support Your Mental Health Crochet has a calming rhythm that naturally encourages you to breathe slower and focus. It's no surprise that so many people turn to it as a way to manage stress and anxiety or simply to unwind at the end of a long day. I find a lot of comfort in crocheting whilst dealing with my anxiety. When I’m having a particularly rough time it’s the thing I turn to rather than doomscrolling on my phone or laying on the settee bing watching Netflix, both of which have their place but when my anxiety is high they exacerbate the issue. Sometimes I need a really complex pattern that’s going to require all of my focus and attention so that my mind cannot wander. Other times I need a simple, meditative project, such as a ribbed beanie or ripple blanket, that doesn’t need my attention at all and I can just relax into the rhythm of the stitches. It’s like a mini reset button and I don’t know what I’d do without it. Setting yourself mini goals with a crochet project such as ‘I will crochet two rows of my blanket today’ can be a gentle way to motivate and remind yourself that you are capable of doing things. Because you can do things, you’re amazing! 7. You Can Find Community ♡ Crochet is a lovely way to connect with others, I’ve made a lot of friends online through my crochet and they’re honestly some of the kindest most supportive people I know! Whether it's a local crafting group, a hosted CAL (crochet-along) online (like the Sirdar Halloween CAL that starts on 23rd July), or just sharing your makes on social media there’s a whole world of makers ready to welcome you into the community. It's a shared language of stitches, a love of yarn hoarding and a whole host of abandoned WIPs (work in progress) and there’s always room for one more in the club so grab your hook and yarn and come join us! Bonus reason: It’s a super portable hobby. I love to have a small project such as a hat, washcloth, a panel of a cardigan or something that I can pack into my bag when I go out and then whip out when I get a spare 5 minutes. It stops me from feeling like I have to reach for my phone whilst I’m waiting at the doctors or waiting to pick up the boys from Beavers. Ready to Get Started? You don’t need much to start, just a hook, some yarn and a little creative curiosity. If you're looking for a simple, beginner-friendly project to try, I’ve got plenty right here at Brambles & Hart to get you going. Try the free Flower Power Garland , get a Dino Beanie on your hook or if you're feeling ready for your first garment then the Hazel Cardigan is a great place to start! Crochet isn’t just a hobby—it’s a way to slow down, create, and connect. And I’d love to help you start your journey. Shelley ♡
- Mid-Year Book Blanket Update
Last month I did not post my monthly update for May (sorry!). I kind of got in my head a bit about nobody reading the posts anyway but actually I need to remember that these posts are for me. I want to be able to look back on them and see what I was reading, what books I enjoyed, what I didn't and have a reminder of this process. With that being said - let's get into the June update. This one is going to be slightly different to my normal monthly updates. As we have now officially entered into the second half of the year (how?!) I want to take a look back on the books I've read and give a little run down of my top ten books of the year so far. At the end of June, I had read a total of 66 books ! Just 4 shy of my overall yearly goal of 70 books - I've honestly amazed myself, audiobooks have absolutely played a huge part in this number and if you've not tried listening to audiobooks yet then I highly recommend it. So out of the 66 books that I read in the first half of the year I'm going to attempt to pick my top five. I have read some absolutely incredible books so I feel that this is going to be quite the challenge! My Top Five Books of 2025 so far! (Title, Author, Format, Rating) Dungeon Crawler Carl by Matt Dinniman - 6 stars! Yes 6 stars! My husband and I listened to this during our road trip from Scotland to England to visit family. It had been on my TBR for a while but never near the top as I wasn't sure that I would actually like it. It's a LitRPG and as someone who doesn't play video games I wasn't convinced that this genre would be for me. Oh boy, how wrong I was. The story is so well written and the audiobook is absolutely phenomenal! It's hilarious, really laugh-out-loud funny, there's action, mystery and intrigue, a talking cat named Princess Donut, trolls, monsters, battles and more! It all sounds a bit crazy but it works. We're now listening to book 3 in the series and so far they've all been amazing. Atmosphere by Taylor Jenkins Reid - 5 stars This was a new release last month and I had been waiting patiently for it to come out since I'd seen it advertised at the start of the year. I've read a few books by TJR and I really enjoy her writing style, I'm also a bit of a space nerd so knowing that this was about a female astronaut at NASA had me really excited. It was so much more than I expected, oh my heart! TJR writes people and relationships so beautifully. I was fully invested in the characters and their lives. The NASA storyline was perhaps not quite the star of the show like I was expecting but it was still really well written and I enjoyed every moment of this book. The Invisible Life of Addie LaRue by V.E Schwab - 5 stars This book is now one of my favourite books of all time, it may even top The Time Traveler's Wife which has been my number one for the last 15+ years! I was so enamoured with the life of Addie LaRue. Such a beautifully written story. It broke my heart and put it back together and broke it all over again. The story of Addie’s long life as a result of the deal she made was engaging, I enjoyed the time-hopping chapters and also the dual perspectives of both Addie and Henry. Henry himself was a well-written, multilayered character who I just wanted to give the biggest hug. The whole thing was just beautiful. Blood Over Bright Haven by M.L Wang - 4.75 stars This book was incredible, I listened to it back in February and it's still one that I keep on recommending to people. It has such an original plot and a really unique magic system. The main characters are great, the world building immersive and the pacing good. The magic system is complex and at the beginning it was a bit of information overload and it took me a while to get my head around but once I was in I was locked IN! I laughed, I cried, I felt hopeful and heartbroken all at the same time. I highly highly recommend this book. Chain Gang All Stars by Nana Kwame Adjei-Brenyah - 5 stars I also listened to the audiobook back in Februrary and I still think about it often. The characters are fantastic, the plot original and engaging, the world believable (unfortunately perhaps too believable), it’s fast paced and action packed. Everything you could ask for in a book. The book addresses many complex and important issues such as racism, injustice, the American prison system and how society is becoming desensitised to violence and it does so in a way that is both thought provoking and impactful. This book really will stay with me for a long time. What have been your top reads so far of 2025? I realise that all of these are books of which I listened to the audio version. There is something so immersive about audiobooks that I am truly obsessed with. I have clearly spent hours and hours listening to audiobooks this year and I'm not mad about it - I hope I have many more amazing listens this year. As always, you can follow my progress on Fable App and if you decide to join me in making a book blanket then be sure to tag me in your content @brambles.and.hart and use #BookBlanket2025 and #Booksandcrochet. I'm loving connecting with people who love both books and crochet like me! I'll be back with another update on my book blanket next month so be sure to keep an eye out for that. Happy reading and crocheting! Shelley ♡