
Rainbow Drops Blanket - Free Pattern
- 11 minutes ago
- 5 min read
The Rainbow Drops blanket is perhaps the softest, snuggliest blanket I have ever made!
I designed this blanket using Yarnsmiths Chenille DK which is a new yarn to the Yarnsmiths range and available exclusively at Wool Warehouse (not an affiliate link) You can read my honest review of the yarn here. For this blanket pattern I selected 9 stunning pastel shades of the Chenille DK and paired them together in a colourblock style to create a beautifully eye-catching pastel rainbow blanket. Finished with a clean and simple border, this blanket is the sweetest!

At time of publication (April 2026) Chenille DK is currently on offer for £1.50 per 50g ball (usually £2.50) so it's pretty sweet on the price too. A large baby blanket for less than £15 (still only £22.50 at full price!)
This is a beginner friendly pattern, although if you are not familiar crocheting with chenille yarn I would suggest having a little practice first. It would also be a great mindfulness crochet project for a more experienced crocheter. I also think that the Rainbow Drops Blanket would make such a wonderful new baby gift! Of course you can switch up the colours to work with a colour scheme of your choice but I am a little in love with this one even if it's not my usual colour palette.
Now let's get to the pattern!

Before you begin:
You will need:
1 ball of Yarnsmiths Chenille DK in each of the following shades:
Blush, Peach, Lemon Yellow, Light Pink, Pale Lilac, Sky Blue, Duck Egg, Light Sage and Cream.
A 5mm crochet hook
Scissors
Tapestry needle
Optional - lighter or match to melt the end of the chenille yarn before weaving in your ends.
Yarn Notes:
The yarn amounts provided for this pattern are based on making a blanket that has a finished measurement of 88cm x 85cm/ 34.5" x 33.5". If you wish to make alterations to the size of the blanket then you may need more or less yarn. Also be sure to check your gauge as a different tension could also result in you requiring more or less yarn.
I have used 8 different shades to give me 8 different colour blocks. You could use 4 colours and repeat them twice, or add in more shades for more colour blocks.
Stitch Abbreviations
(US Terms)
SC - single crochet
HDC - half double crochet
DC - double crochet
Cluster - granny stitch/ 3DC worked into the same space
Sp - space
Sl st - slip stitch
Ch - chain
Gauge:
4.5 Clusters x 9 rows = 10 x 10 cm/4" x 4"


Pattern Notes:
Ch2 at the start of a row does count as a stitch unless stated otherwise.
You will be working in rows, turning your work at the end of each row.
For the border you will work in the round.
You will only change colour at the end of a row.
To do so, fasten off your working yarn leaving a long tail for weaving in. Turn your work to begin the next row, attach your new colour to the first stitch and ch2.
To alter the width of your blanket you will need a starting chain that is a multiple of 3.
The Pattern:
Blanket
Using Blush and a 5mm hook, chain 108
Note: If you find it difficult working into the chain you can use a larger hook then switch to the 5mm for row 1 onwards.
Row 1 (RS):
DC into the 3rd chain from then hook (the ch2 counts as a stitch here so you now have 2 sts - the ch2 and the DC). *Skip 2 chains, 3DC into the next st*. Repeat from * to * until you have 3 chains remaining. Skip 2 chains and work 2DC into the final chain. Ch2 and turn.
You should have 34 clusters (3DC) and 2 2DCs (one at either end).
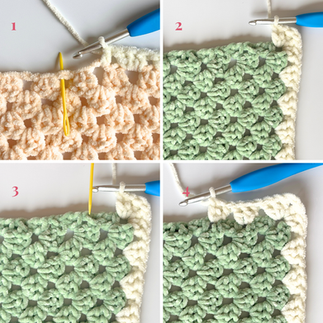
Row 2 (WS):
Work 3 DC into the space between the 2DC and first cluster of the previous row. 3DC into each space along until you reach the end of the row. DC into the top of the ch2. Ch2 and turn.
Row 3 (RS):
DC into the st at the base of the ch2. Work 3DC into the space between each cluster along. Work 2 DC into the top of the ch2. Ch2 and turn.


Rows 4 - 9:
Repeat rows 2 and 3 alternately.
Fasten off Blush at the end of Row 9 and join Peach.
Rows 10 - 18:
Repeat rows 2 and 3 alternately, ending with a repeat of row 2.
Fasten off Peach at the end of Row 18.
You will continue on in the pattern, repeating rows 2 and 3 alternately and changing colour every 9 rows. Your row count and colour order will be as follows:

Rows 19 - 27:
Lemon Yellow
Rows 28 - 26:
Light Pink
Rows 37 - 45:
Pale Lilac
Rows 46 - 54:
Sky Blue
Rows 55 - 63:
Duck Egg
Rows 64 - 72:
Light Sage
Fasten off Light Sage and continue on to the border.
Border
Using a 5mm hook.
With the RS facing you, attach Cream to a space between clusters along the bottom edge of your blanket.
Round 1:
Ch2 and work 2DC into the same space. Work 3DC into each space along until you reach the corner. You will be working over your starting chain.
When you reach the corner, work (3DC, ch2, 3DC) all into the same space. This will mean working over the 2DC at the end of the row.
When working along the edge of the blanket, work 3DC into every other row. These will be the rows that started/ended with a single DC. You will crochet over the post of the stitch.
At the corner, work (3DC, ch2, 3DC) and then work 3DC into the space between each cluster along.
Repeat this around your blanket until you reach where you began. Sl st to top of ch2 to join.
Ch1 and do not turn.


Round 2:
HDC into each stitch around, working 3HDC into each corner ch-sp. Sl st to first HDC to join. Ch1 and do not turn.
Round 3:
SC into each st around, working 2SC into the middle HDC at each corner. Sl st to first SC to join. Fasten off.
Weave in all of your ends and your blanket is complete!
Note: When it comes to weaving in your ends using chenille yarn, you may find that you experience a lot of shedding. To combat this you can use a lighter to melt the end of the yarn, only very lightly as you don't want any black charring! Then you can weave in your end as normal without the shedding.
Project Complete!

I really hope that you enjoyed making your very own Rainbow Drops Blanket!
I'd love to see your versions so please do tag me in your posts on social media @Brambles.and.Hart and use the hashtags #BHFreePatternMakes #BramblesandHart
If you are not already following me on social media then what are you doing?! I'd love to see you over on Instagram @Brambles.and.Hart, and do subscribe to my YouTube Channel which will see a little revival very soon!
If you would like to support me further and help me to keep creating free patterns and tutorials to share with you then do consider buying me a coffee on Ko-fi!
Happy crocheting!
Shelley ♡


Comments